Loading...
Loading...
Loading...
Loading...
Loading...
Loading...

About

  • BetterBugs
  • Our Story
  • Blog
  • Glossary
  • Docs
  • Code of Conduct

Legal

  • Terms & Conditions
  • Privacy Policy
  • Cancellations & Refunds

Features

  • Record Screens
  • Create Markups
  • Developer Logs
  • Rewind
  • Collaborate with Team
  • Integrate with Project Tools
  • AI Assistant

Integrations

  • Slack
  • Jira
  • Linear
  • ClickUp
  • Asana
  • GitHub
  • MS Teams
  • Trello
  • Sentry
  • Azure Boards

Use Cases

  • QA Engineers
  • Developers
  • Managers
  • Support Teams
  • Founders
Logo

© 2026, All Rights Reserved

Nothing here!
Show us some love 💖. Try BetterBugs today if you haven’t already. A quick feedback and a rating on our Chrome web store page would be awesome!

Share your experience with the founderhere!

Don’t wait! Start reporting now.

Logo
  • Products

  • Solutions

  • Integrations

  • Resources

  • Pricing

  • BB for Support

  • MCPNew

Login
Logo

Jira Bug Reporting: Easy Steps for Creating Jira Tickets [2026]

Nishil Patel

Nishil Patel

Jul 30, 2026

6 min read

Last Updated Jul 30, 2026

Last Updated Jul 30, 2026

Share

Jira Bug Reporting: Easy Steps for Creating Jira Tickets [2026]

In this article, check out the steps for creating a Jira ticket as a bug report. We’ve also described what a bug means in Jira, its purpose, why effective bug reports matter, and how to report bugs in Jira manually and using BetterBugs.io (that automates the evidence gathering gruntwork for bug reporting) in 2026.

Table of Contents

1.

What is a Bug in Jira?

2.

What is the Purpose of a Bug Report?

3.

Why Effective Bug Reports Matter?

4.

How to Create Jira Tickets 10X Faster for Bug Reporting: Using BetterBugs.io

5.

How to Create a Jira Ticket: Using Default Steps in Jira

6.

FAQs

What is a Bug in Jira?

In Jira, a bug is a specific issue type. It’s a Jira work item that represents a software defect/bug that includes the bug summary, reproduction steps for it, its business details, technical impact, and supporting artifacts (such as documents, technical logs, screenshots, or videos) for diagnosing and fixing the defect. Simply put, it's a Jira ticket to track software defects/bugs throughout the bug lifecycle. 

Also Read: How to create smart automation workflows in Jira?

What is the Purpose of a Bug Report?

Writing effective bug reports enables you to you to:

  • Clearly and consistently document all relevant aspects of a bug for future investigation, discussion, and action.
  • Detail exactly how to trigger the bug for quick verification by devs or other testers.
  • Compare expected and actual results or behavior of a software feature, function, or a module as per project specs.
  • Assess the severity, technical/business impact, and urgency so that the most critical bugs are fixed first.
  • Ensure key members and stakeholders can follow the bug from identification through triage, assignment, resolution, and closure. Plus, it allows you to track all status changes and communications.

Why Effective Bug Reports Matter?

Here’s how effective bug reports can help:

  • Faster debugging — Detailed steps, technical logs, and visuals reduce time spent clarifying or reproducing the issue. This allows devs to get the complete context and technical info to fix bugs in a set timeframe.
  • Reduced back-and-forth — Well-described bugs helps minimize redundant follow-ups and repeated context-setting among team members.
  • More clarity for root cause analysis — Environment specifics and repro steps makes it easier to analyze trends and identify underlying issues or patterns.
  • Better release quality — Accurate bug tracking supports better triage, smoother sprints and sprint retrospectives, and avoidance of repeated errors or regressions.

Also Read: What are Bug Triage Meetings and How to Run It: Complete Guide

How to Create Jira Tickets 10X Faster for Bug Reporting: Using BetterBugs.io

What is BetterBugs.io

BetterBugs.io is a free, lightweight, and snappy visual bug reporting Chrome extension that allows you to create Jira bug reports within minutes. You can create bit-perfect bug reports for devs in just a few clicks — right from your browser. It's suitable for both technical and non-technical users, with an intuitive and no-code setup.

It’s perfect for:

  • Visual bug reporting
  • Bug tracking
  • Running end-to-end bug lifecycles 
  • Quality Assurance and Quality Control activities
  • Debugging (manually or with the integrated AI Debugger)
  • AI Debugging using BetterBugs MCP Server (using Bug Report Link + Quick Prompt)
  • Beta testing 
  • UI/UX reviews

Also Read: What is Quality Assurance? Explained 

How BetterBugs Can Help Create Jira Tickets as Bug Reports

When you capture a bug using BetterBugs.io, you do not need to add the details manually to your Jira project while reporting issues.

With every screenshot or screen recording, BetterBugs.io auto-packs in the technical details, such as console logs, network requests, env info, backend event logs (from Sentry integration) and others. Plus, you can add issue repro steps with AI, include attachments, set priority, and tags. 

You can share it instantly to Jira right from your browser tab. Others can access the complete bug report with the unique report link directly or from the Jira ticket. BetterBugs also comes with a Jira 2-way sync for comments and status updates.

You can integrate BetterBugs.io with 15+ PM tools and issue trackers (Jira, Asana, GitHub, GitLab, and many others). It also comes with automation features that allows you to send bug reports to one or more tools instantly, right from your browser tab. 

Plus, you can use the BetterBugs MCP Server that enables you to run AI debugging sessions in your preferred IDEs and text editors (VS Code, Cursor, Windsurf, Claude, and others). You can add BetterBugs MCP Server using a small code snippet to your text editor. Then, all you gotta do is to paste the bug report link + quick prompt to start the RCA and debugging sessions within seconds. 

Create Jira Tickets under 120 Seconds and Debug Using MCP

Steps to integrate BetterBugs.io with Jira (under 60 seconds)

Once you download the extension and create an account for it (to manage all reports from one place), here’s are the steps to integrate it with your Jira workspace:
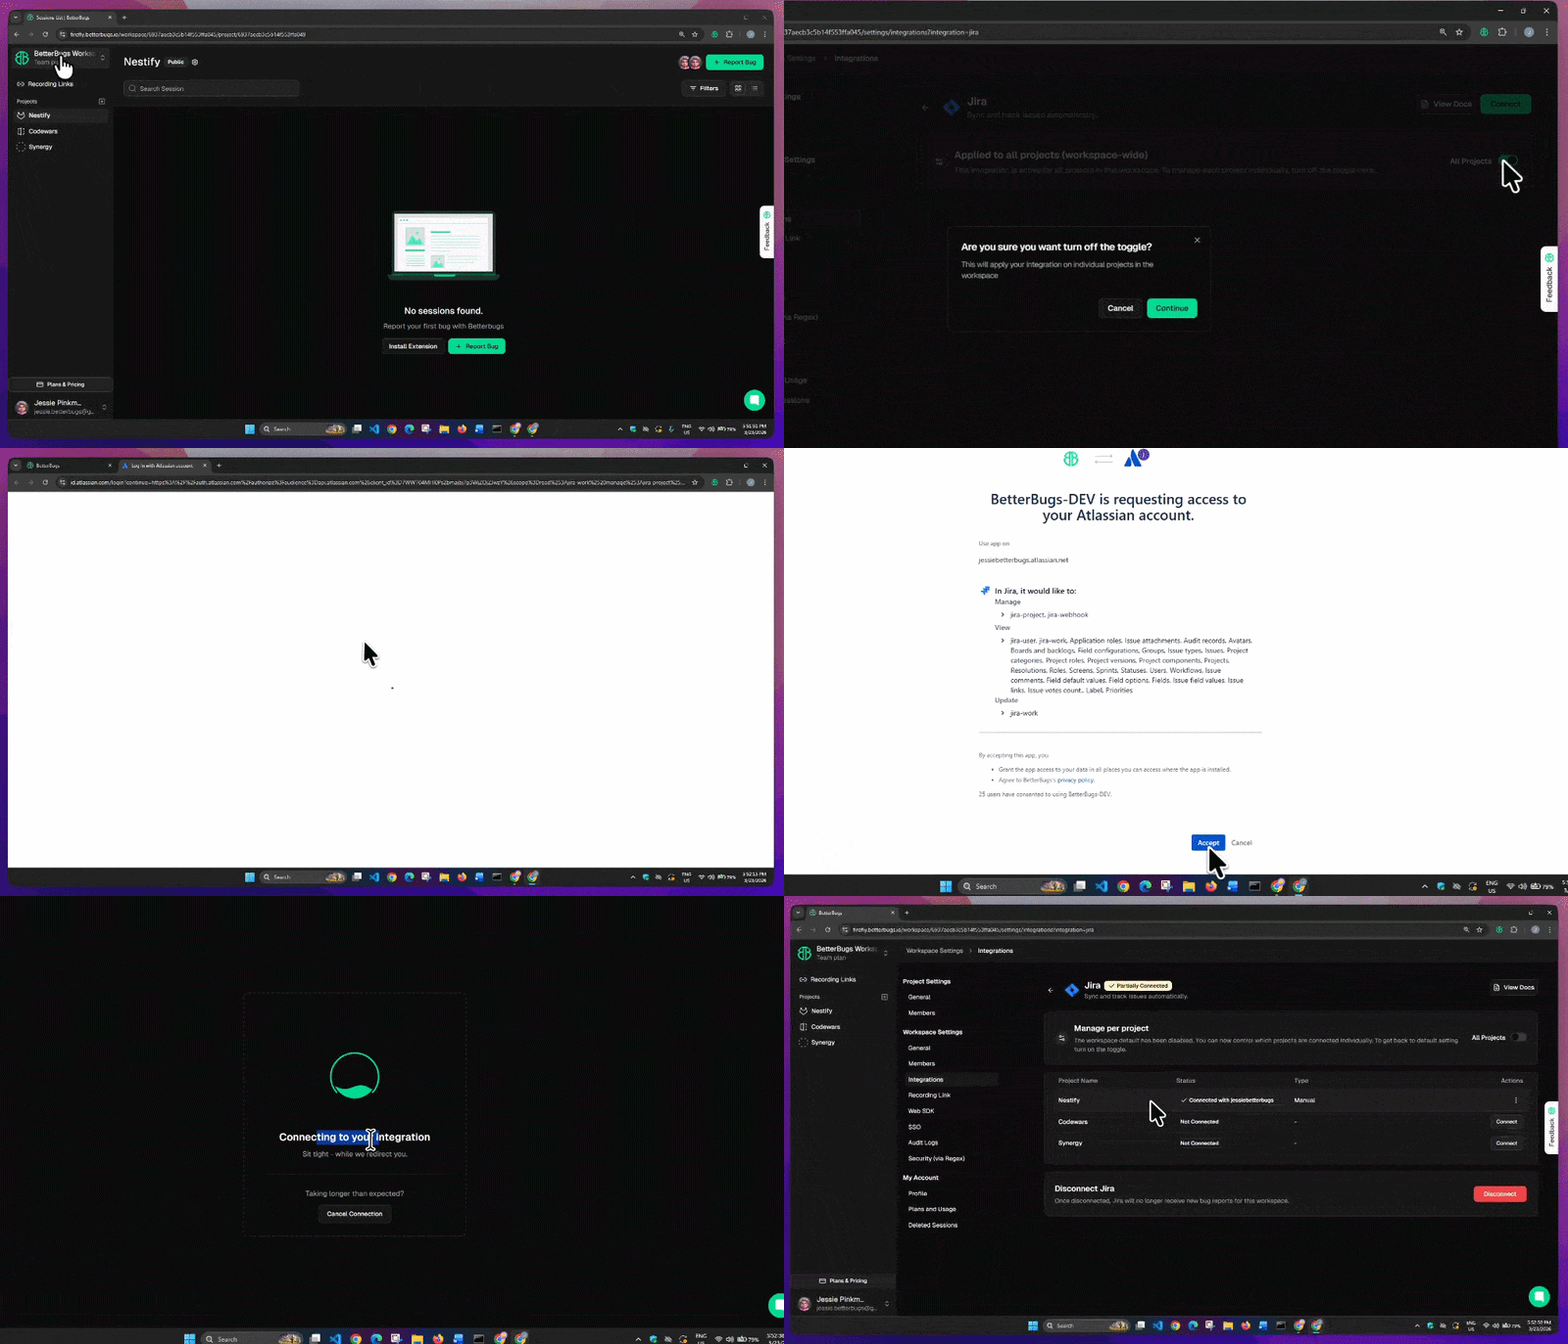
BetterBugs Integration with Jira Video Demo

BetterBugs Integration with Jira | Under 60 Seconds | Video Demo

  1. Open Workspace Settings: Click your Workspace name (at the top left) > Gear Icon > Integrations.
  2. Search Jira: In the Integrations tab, find and open the Jira card.
  3. Turn Off Workspace-Wide Integration: Toggle off "All Projects" and hit "Continue" to enable project-wise management.
  4. Select and Connect Project: Find your project in the list and click "Connect" under the "Actions" column.
  5. Authorize BetterBugs: Click Accept to authorize BetterBugs.io for your Jira account. (Free plan users can skip remaining steps).
  6. Choose Ticket Method (Optional): From the "Forward Bug Reports" dropdown, select your preference:
    • Manually (Free): You manually populate Jira fields when sharing a bug.
    • Automatically (Paid): BetterBugs auto-populates Jira fields for you.
  7. Connect: Select "Manually" from the dropdown and hit “Connect”.

Okay! That completes the integration.

How to create a Jira Ticket under 120 seconds: Using BetterBugs.io

Here’s how you can do it:

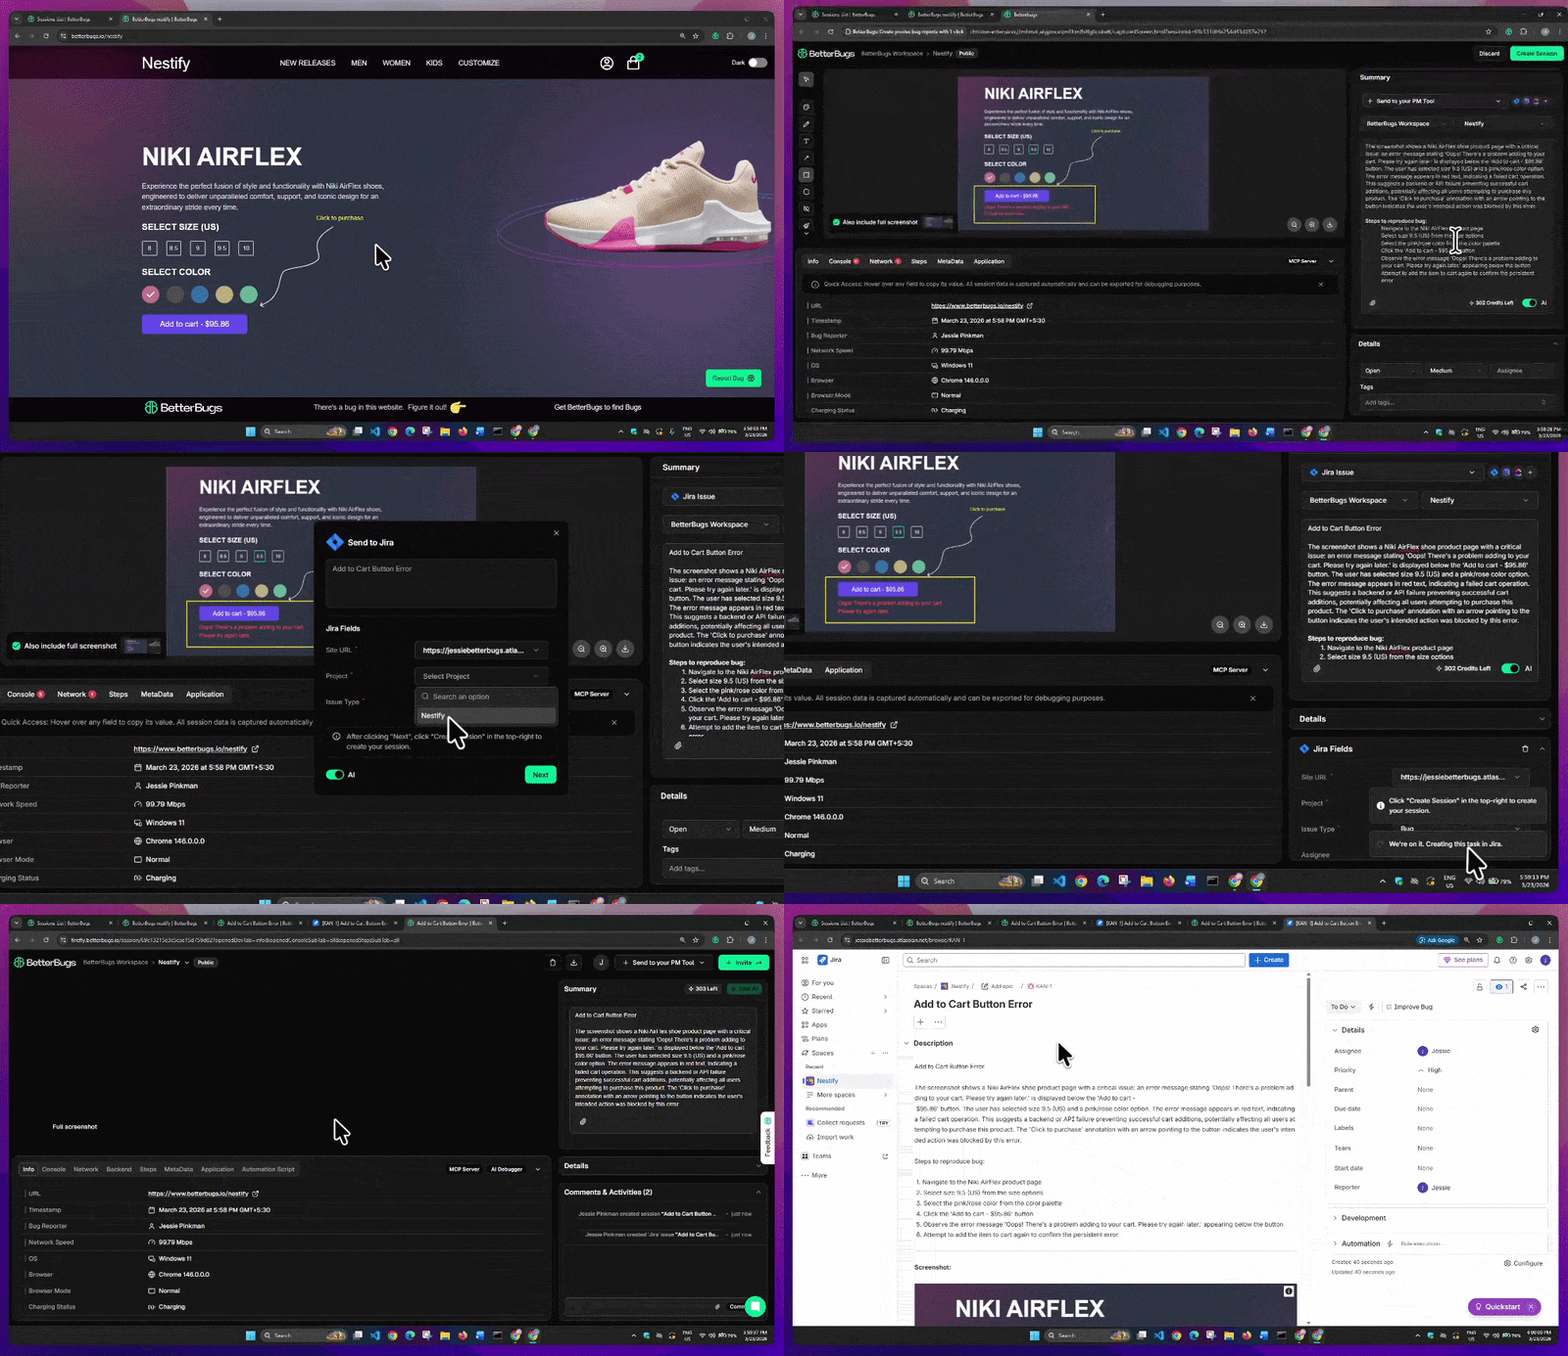
Create-a-Jira-Ticket-Using-BetterBugs-io-Steps

Create a Jira Ticket as Bug Reports under 120 Seconds using BetterBugs.io | Video Demo

  1. Capture Bug and Add Details for the Bug: Use the BetterBugs extension to capture the bug as a screenshot, screen recording, or a Rewind session video. Add the title, summary, and reproduction steps either manually or automatically using the "AI" toggle.
  2. Select Workspace and Project: Use the dropdowns above the description to select your BetterBugs Workspace and the specific Project integrated with Jira.
  3. Select Jira Issue: Click the "+ Send to your PM Tool" dropdown and select "Jira Issue".
  4. Populate Jira Fields: Fill in the required Jira details (Site URL, Project, Issue Type, etc.) and click "Next".
  5. Create Session: Click "Create Session" in the top right.

A new tab opens with your Jira ticket, auto-bundled with the debugging details and reporter info + a link to the complete report.

How to Create a Jira Ticket: Using Default Steps in Jira

Here’re the steps for it:

1 - Open Jira Project

Login to your Jira account and open the relevant project to report the bug.

2 - Hit “Create” to start documenting the issue

Click “Create” from the top of your screen. This opens a new window for creating and submitting the issue type.   

3 - Select Space

Select a Space (Project) for which you want to create an issue.   

4 - Select Work type and Status

Select the “Work type” (Issue Type) —> “Bug” and select a status for it (TO DO, IN PROGRESS, or any other). This action sets the workflow, status, and required fields specific to bug tracking.

5 - Add Summary

Next, write a concise, clear title indicating the nature and location of the bug.

6 - Add Description

Describe the issue with details including:

  • Steps to Reproduce — Numbered, repeatable steps, including all relevant details.
  • Expected Result — What the software should do.
  • Actual Result — What it did instead.
  • Environment — Include device and meta information, such as browser, OS, device, app/version, and backend context.
  • Technical details — Add error logs, network request info, console warnings.

7. Add other details

Add details for:

  • Assignee
  • Labels (helps improve searchability and routing for that specific issue)
  • Parent (depending upon the work items in your project hierarchy)
  • Due date
  • Team
  • Start date
  • Sprint
  • Story point estimate
  • Reporter

Also Read: Can’t update story status in Jira? Here’s why and how to fix it

8 - Include Attachments

Include relevant attachments for the issue:

  • Visual proof of the bug — Annotated screenshots, screen recordings
  • Supporting info and files — Include documents such as requirement traceability matrix (RTMs), requirement docs, log files, and others.

You can drag and drop files, or click “Browse” to add files from your system.

Also Read: Can’t attach mp4 to Jira tickets? Here’s how to work Jira Attachments 

9. Linked work items

If the bug relates to a user story or blocks another issue, consider linking the relevant Jira tickets with the “bug”.

8. Review the report and click “Create” to submit the bug

Double-check your entries for typos and missing data. Once all required and recommended fields are complete, click “Create”. Jira assigns a unique key to your bug (e.g., BDT-12), and you should see a confirmation.

Create One Click Bug Reports that Devs Love

FAQs

What is the difference between a bug and a user story in Jira?
Can I report a bug without technical details?
How do I prioritize a bug in Jira?

Bug prioritization is typically based on two main factors: severity (how critical the bug is) and priority (how urgent it is to fix). For example, a bug that prevents users from logging in would have both a high severity and a high priority. Jira's default priority levels often include "Highest," "High," "Medium," "Low," and "Lowest," which you can use to communicate the bug's urgency to the team.

What's the best way to attach a screen recording to a Jira bug report?
How do I know if the bug I'm reporting is a duplicate?
Written by
Nishil Patel

Nishil Patel | CEO & Founder

Follow

Nishil is a successful serial entrepreneur. He has more than a decade of experience in the software industry. He advocates for a culture of excellence in every software product.

Subscribe to our updates

Meet the Author: Nishil Patel, CEO, and Co-founder of BetterBugs. With a passion for innovation and a mission to improve software quality.

We never spam.