Loading...
Loading...
Loading...
Loading...
Loading...
Loading...

About

  • BetterBugs
  • Our Story
  • Blog
  • Glossary
  • Docs
  • Code of Conduct

Legal

  • Terms & Conditions
  • Privacy Policy
  • Cancellations & Refunds

Features

  • Record Screens
  • Create Markups
  • Developer Logs
  • Rewind
  • Collaborate with Team
  • Integrate with Project Tools
  • AI Assistant

Integrations

  • Slack
  • Jira
  • Linear
  • ClickUp
  • Asana
  • GitHub
  • MS Teams
  • Trello
  • Sentry
  • Azure Boards

Use Cases

  • QA Engineers
  • Developers
  • Managers
  • Support Teams
  • Founders
Logo

© 2026, All Rights Reserved

Nothing here!
Show us some love 💖. Try BetterBugs today if you haven’t already. A quick feedback and a rating on our Chrome web store page would be awesome!

Share your experience with the founderhere!

Don’t wait! Start reporting now.

Logo
  • Products

  • Solutions

  • Integrations

  • Resources

  • Pricing

  • BB for Support

  • MCPNew

Login
Logo

[2026] How to Screen Record on Windows 10: Top 3 Ways

Nishil Patel

Nishil Patel

Oct 6, 2026

6 min read

Last Updated Oct 6, 2026
Last Updated Oct 6, 2026

Share

[2026] How to Screen Record on Windows 10: Top 3 Ways

Check out easy ways to record your screen on your Windows 10 system in 2026 using BetterBugs.io free Chrome extension, built-in XBox Game Bar app, and the PowerPoint app.

Table of Contents

1.

Introduction

2.

How to screen record in Windows 10: Top 3 Ways

3.

Method 1: How to Screen Record on Windows 10 with BetterBugs.io — Free Chrome extension

4.

Method 2: How to Screen Record on Windows 10 with XBox Game Bar

5.

Method 3: How to Screen Record on Windows 10 with MS PowerPoint

6.

FAQs

Introduction

In this article, we’ve included 3 easy ways to record your screen on Windows 10. For this, you can use BetterBugs.io free Chrome extension that allows you to include system audio, add voice, and video overlay in your screen recordings. BetterBugs.io also comes with quick sharing features. Or, you can use XBox Game Bar and Microsoft Powerpoint (Office 2016 or later).

How to Screen Record on Windows 10 in 2026: Top 3 Ways

You can record screens on Windows 10 using:

  • BetterBugs.io Free Chrome Extension — Perfect for recording your screen on Windows 10 with audio and a video overlay; Instant download and quick sharing features (share using a link, no manual upload required); Record up to 15 mins; Use with on Windows 10/11, macOS, and Linux.
  • XBox Game Bar — Perfect for screen recording if you want to capture you gaming sessions or desktop apps; Up to 4 hours recording; Built-in tool with Windows 10/11
  • Microsoft Powerpoint (bundled with Office version 2016 or later) — Works well for recording screens to include directly  in presentation slides.

Also Read: How to Screen Record on Windows 11: Step-by-Step Guide

Method 1: How to Screen Record on Windows 10 with BetterBugs.io — Free Chrome extension

What is BetterBugs.io

BetterBugs.io is a free and lightweight Chrome extension that enables you to take instant screenshots or record webpage, tabs, or entire visible window with a few clicks. 

Using it, you can record up to 15 mins of your screen on Windows 10/11, macOS, and Linux. 

You can use BetterBugs.io for your everyday screen recording sessions or as a fully-fledged visual bug reporting tool (auto-captures technical details of the issue) for software testing, QA, and debugging activities.
Why we recommend BetterBugs.io

  • Record Chrome tabs or entire window — You can record your web apps in Chrome tabs (Tab) or your entire Window. (free feature; 5 mins in free tier; 15 mins in paid plans)
  • Record Screen on Windows 10 with audio + webcam overlay — You can do screen recording with audio and system sound. Plus, you can add a webcam/video overlay to your recording; it’s perfect for adding additional context, instructions, and highlighting key info as a video message without juggling tools. (free feature)
  • Instant downloads — Once you record, you can instantly download the video to your system in .webm format. It’s perfect for recording high-quality videos with small file sizes. (free feature)
  • Manage your recordings centrally — You do not have to manage your recordings manually. Once you create and upload the video to your BetterBugs dashboard, you can log in and access (and download) it from any Chrome browser.
  • Uploads instantly with quick sharing features — You don’t need to save or upload the video to any cloud or apps manually. In a few clicks, BetterBugs.io uploads it to your dashboard, instantly, right from your browser. You can then share the video (as a report) to others as a unique link. The screen recording is downloadable from the reports. (free feature)
  • Video annotations and blurring — It also enables you to add annotations on your video while recording for highlighting areas. Plus, you can blur areas in your video to hide sensitive information or elements. (paid feature)

How to Record Screen on Windows 10 with BetterBugs.io: Easiest Way

Quick installation and sign up

  1. Download the BetterBugs Chrome Extension. 
  2. Register (to manage all your recordings) using your email. Alternatively, you can use your Google or GitHub account for signing up. 
  3. Pin it to your browser for quick access.

Steps to record screen

Screen Record on Windows 10 with Instant Download Using BetterBugs.io | Video Demo

Screen Record on Windows 10 with Instant Download Using BetterBugs.io | Video Demo

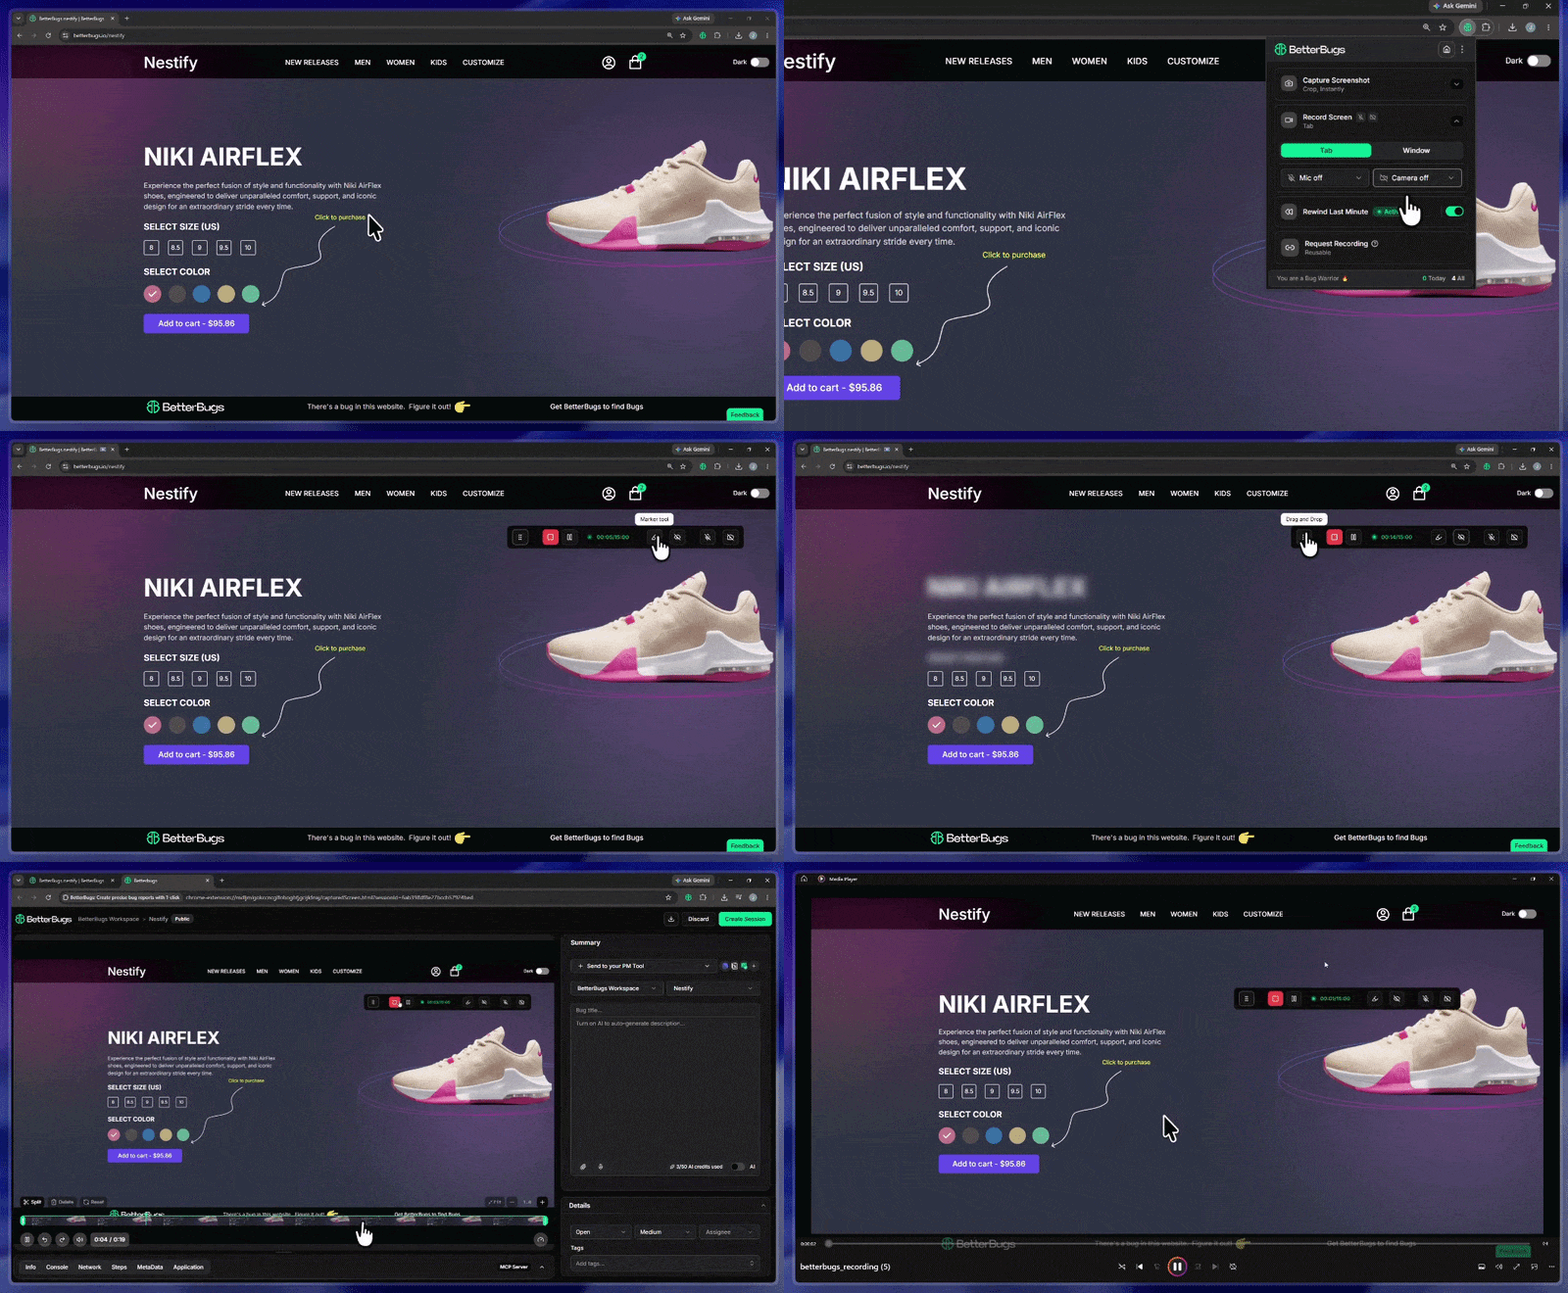
  1. Open the web page you want to record in Chrome.
  2. Open BetterBugs extension and click the “Record Screen” dropdown.
  3. (OPTIONAL) Enable Mic and Webcam capture to add voiceover or a video overlay with your screen recording.
  4. Select recording mode: 
    • Tab: Records a current browser tab (In this mode, the URL address bar, bookmarks bar, and the system toolbar are NOT RECORDED.)
    • Window: For recording, this enables you to select: Specific Browser Tab | Window | Entire Screen
  5. For instance, click “Tab”
  6. A 5 second countdown shows up with a “Ready to Record” popup screen. 
    • If required, click anywhere on the screen to hold-off recording and make any changes for mic and camera selection. Click again to resume/start recording.
  7. (OPTIONAL) Use the marker (to highlight) or blur tool (to hide sensitive info) if required
  8. Click "Stop" from the recording toolbar to end the recording session.

SAVE RECORDING TO SYSTEM: Use the download icon from the top right (of the screen recording) to save video to your local system.

Pro Tip: To record desktop or desktop apps, select Window. Once you start, you can freely minimize the Chrome browser and the recording will continue. Once you’re done with the recording, open the browser window to stop.

FOR QUICK SHARING: Give your video a title and click "Create Session" A session with your recording gets added to your BetterBugs dashboard. With this, you can send the report link to anyone you want to share. They can easily download the video directly from the report.

Also Read: How to Screen Record on Chromebook: Step-by-Step Guide

Easily Record Your Screen on Windows 10 with Audio and Webcam Overlay

Method 2: How to Screen Record on Windows 10 with XBox Game Bar

The XBox Game Bar is a built-in screen recording tool in Windows 10/11 that enables you to record screens in MP4 format for up to 4 hours (you’ll configure this manually from Settings > Capture Gaming > Settings > Manual recording length).

What are the limitations while recording your screen with XBox Game Bar on Windows 10?

  • Single-app recording only — Records one app at a time. It cannot capture your entire desktop or the process of switching between apps.
  • Limited features — Lacks advanced tools like a custom recording area, annotations, or mouse-click emphasis.
  • Performance issues — May impact system performance and cause dropped frames on older computers with less system RAM or video RAM.
  • No built-in feature to add video overlay using webcam  — You’ll need to use a separate app like OBS for it. 
  • Bugs and unreliability — Can be prone to bugs, leading to unexpected stops, system crashes or failed recordings.

Also Read: How to Screen Record on Mac: Step-by-Step Guide

How to Screen Record on Windows 10 with XBox Game Bar: Step-By-Step

Step 1: Open the app to record

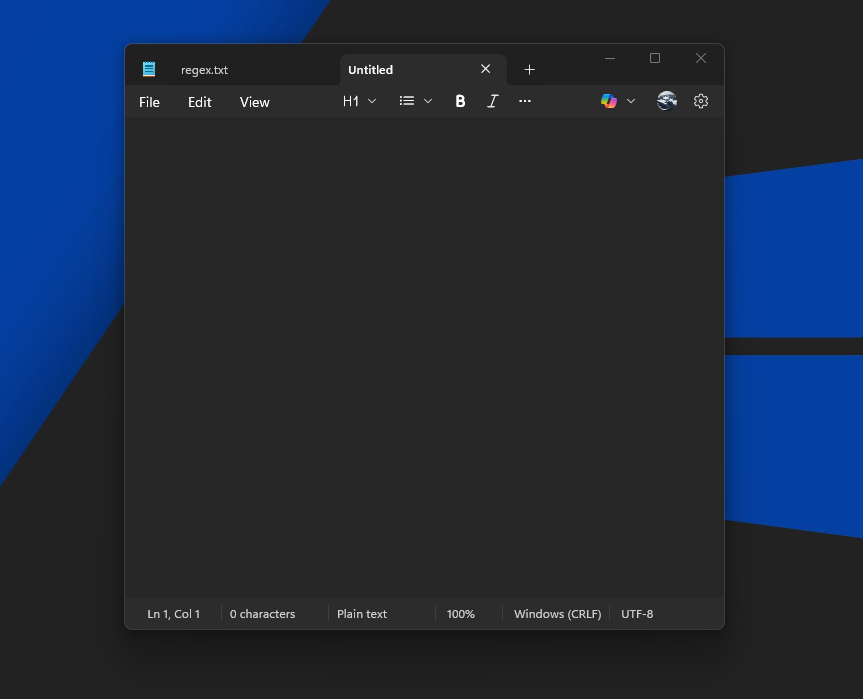
Open the app you want to record. The Xbox Game Bar can only capture one app at a time, so make sure it's the active window. For the demo, we’ve used Notepad as our target app to record.
Open the app to record

Step 2: Open the Game Bar with “Windows + G”

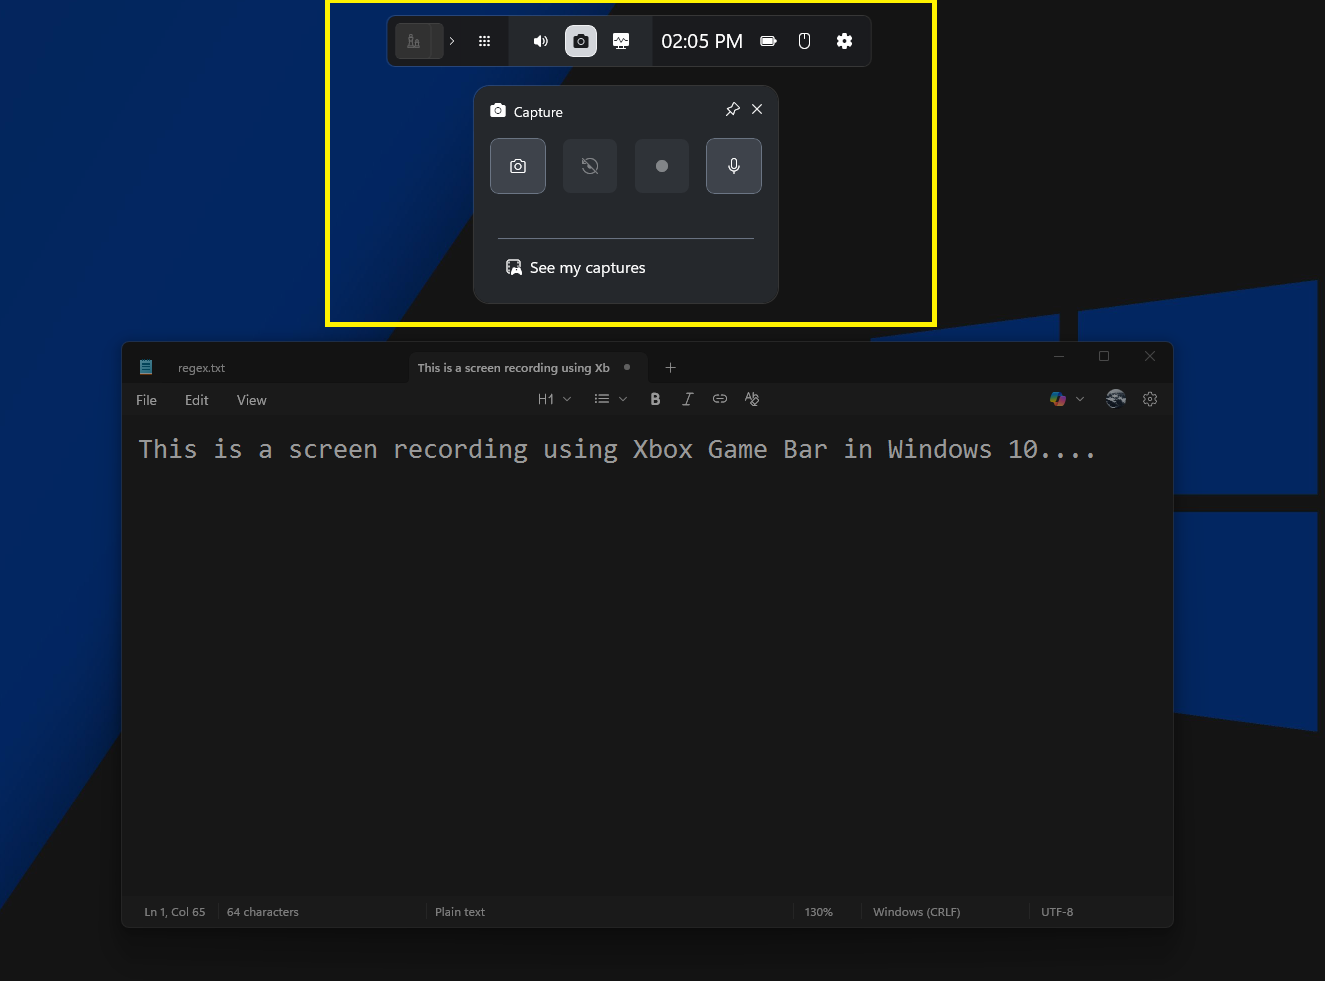
Press “Windows + G” on your keyboard to bring up the Game Bar overlay. If it doesn't appear, enable it from Settings > Gaming > Game Bar and make sure the toggle is on.
Step 2: Open the Game Bar with “Windows + G

Step 3: Find the capture widget

Once the Game Bar is open, look for the Capture widget. If it's not visible, click the “Camera” icon in the Capture widget to display it.
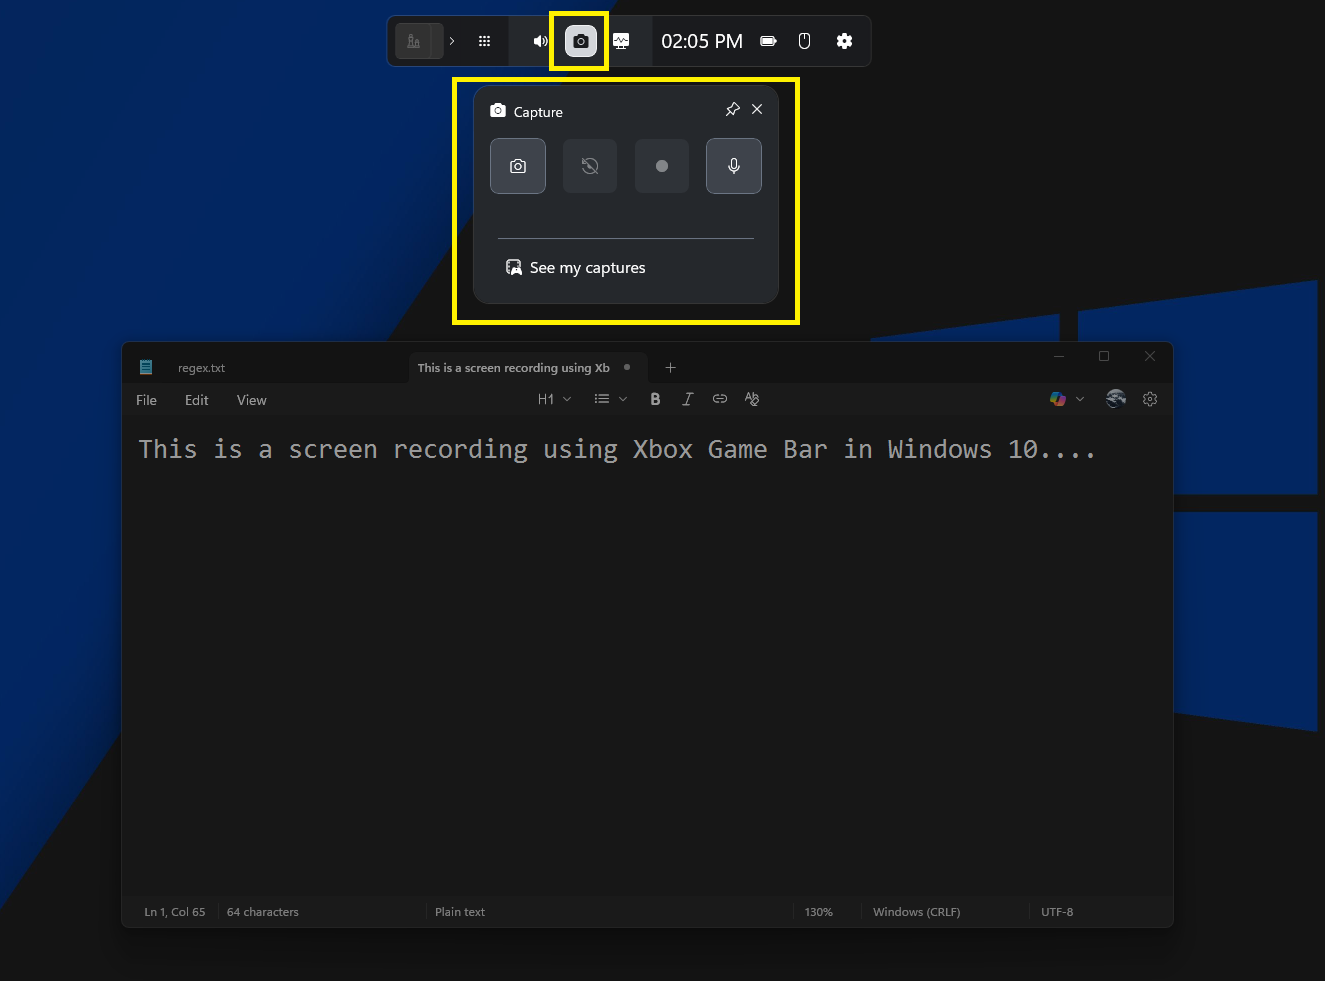
Step 3: Find the capture widget

Step 4: Adjust audio settings (optional)

Before you start, you can set up your audio.
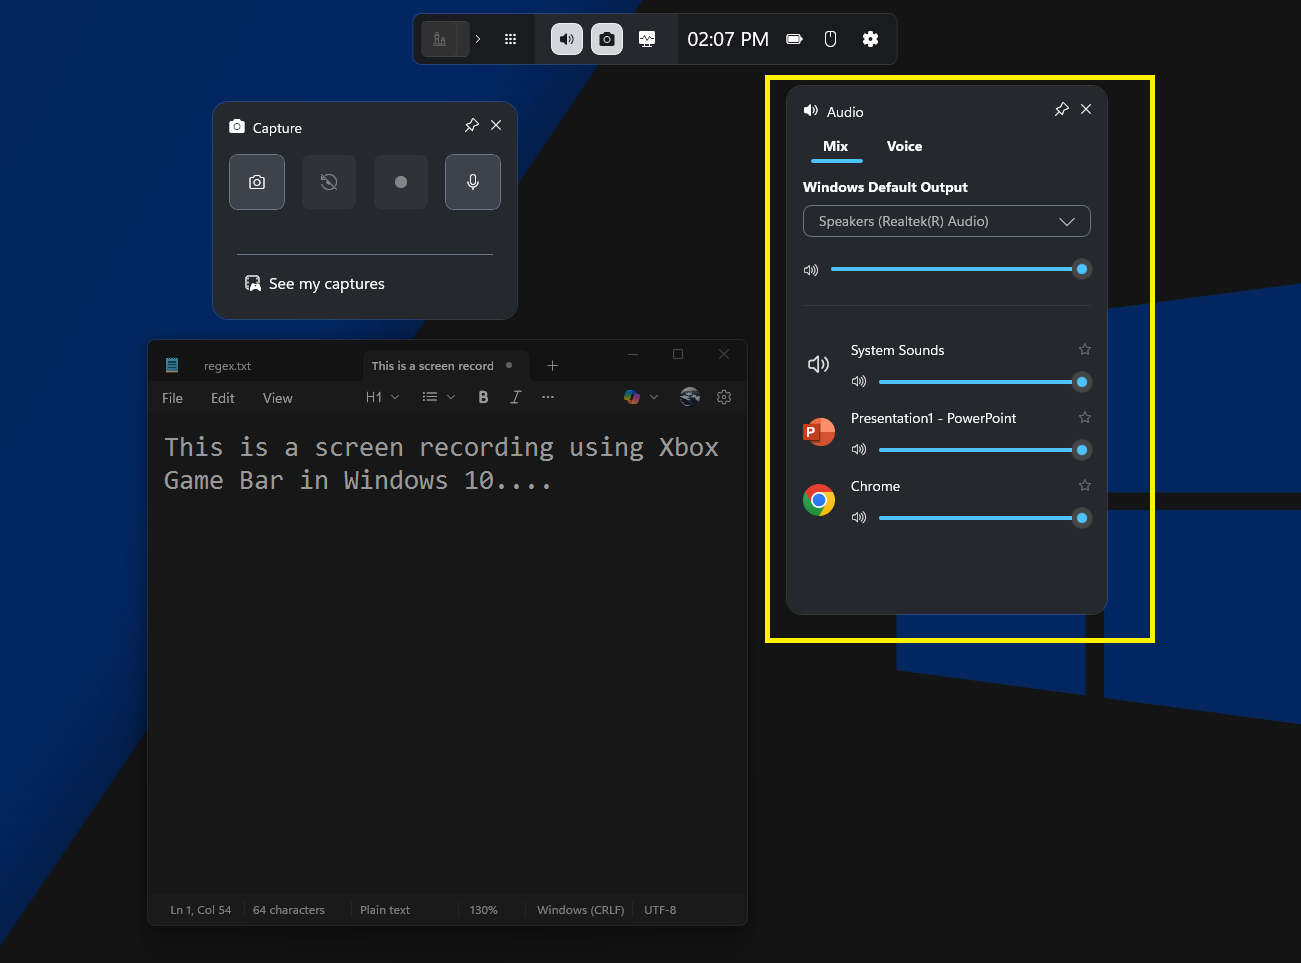
  • Microphone — Click the microphone icon in the Capture widget to turn your mic on or off. This audio is saved separately from the system sounds.
  • System Audio — By default, Windows 10 records all system sounds. You can adjust these settings in the Audio widget if needed.

Step 4: Adjust audio settings (optional)

You can use the shortcut “Windows + Alt + M” to quickly mute or unmute your microphone during the recording.

Step 5: Start the recording

To begin, click the white circle (Record) button in the Capture widget, or use the keyboard shortcut “Windows + Alt + R”. A small "Capture Status" bar will appear on your screen to show that you're recording.

Step 5 Start the recording

Step 6: Stop recording

A small "Capture Status" bar appears on your screen to show that you're recording.

To stop recording, either click the blue “stop” button on the status bar or use the “Windows + Alt + R” keyboard shortcut.
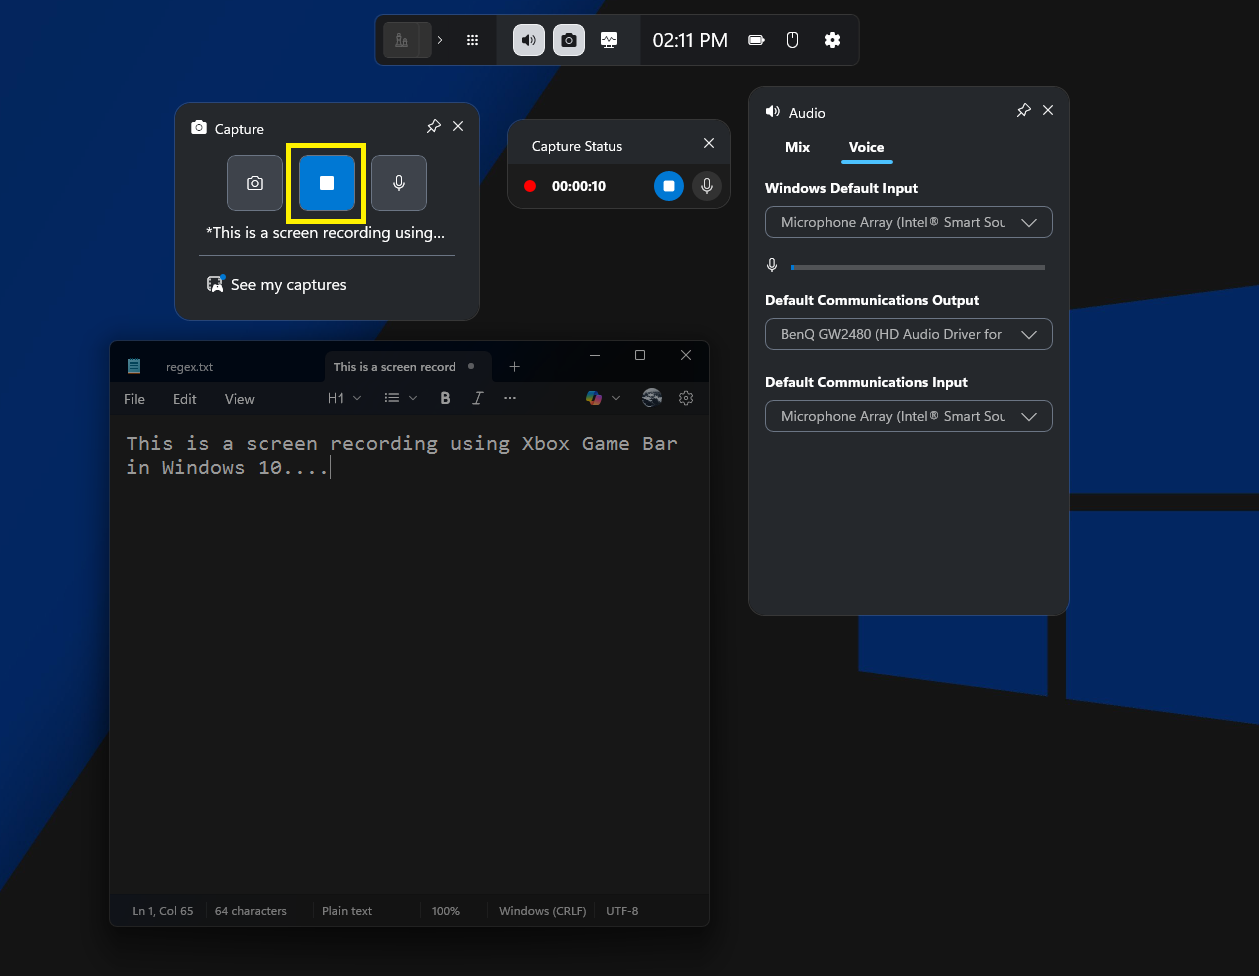
Step 6 Stop recording

Step 7: Access your saved video

Your recording will automatically save as an MP4 file. You can find it in your C:\Users [userName]\Videos\Captures folder.

To view your recordings directly from the Game Bar, click the "See my captures" button in the Capture widget.

Method 3: How to Screen Record on Windows 10 with MS PowerPoint

MS PowerPoint (Office 2016 or later) includes a built-in screen recording that works well while creating document processes or capturing specific flows to include in presentation slides.
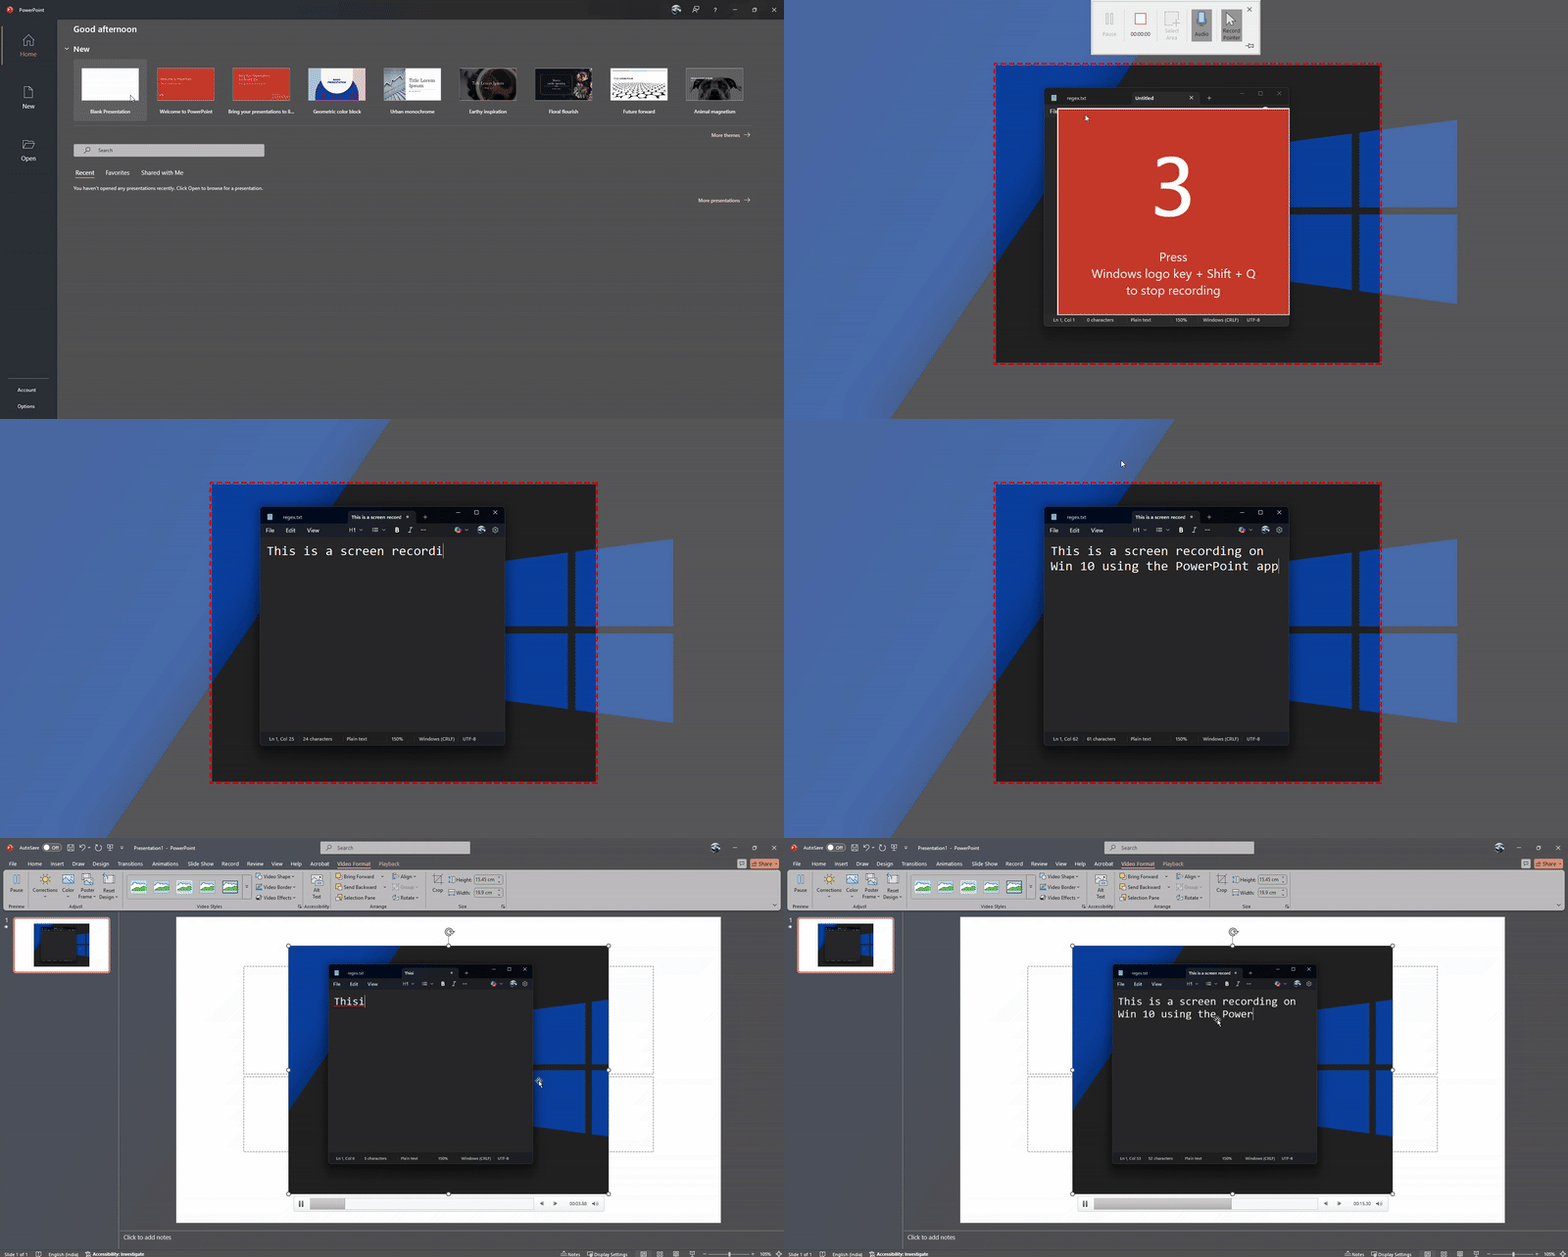
How to Screen Record on Windows 10 with PowerPoint

Screen record on Windows 10 using Microsoft PowerPoint

Some limitations of PowerPoint screen recording

  • Limited to PowerPoint — While you can export recordings, it’s primarily built for embedding videos in presentations.
  • File size issues — Longer recordings embedded in PowerPoint can significantly increase presentation file sizes.
  • Compatibility — Available in Office 2016 or later (you can also update PowerPoint 2013 to add this capability)

How to Screen Record on Windows 10 with Microsoft PowerPoint

Step 1: Open PowerPoint app

From your search bar or desktop, open the PowerPoint app. Click “Blank Presentation”. Alternatively, open an existing ppt file where you want to add the screen recording.
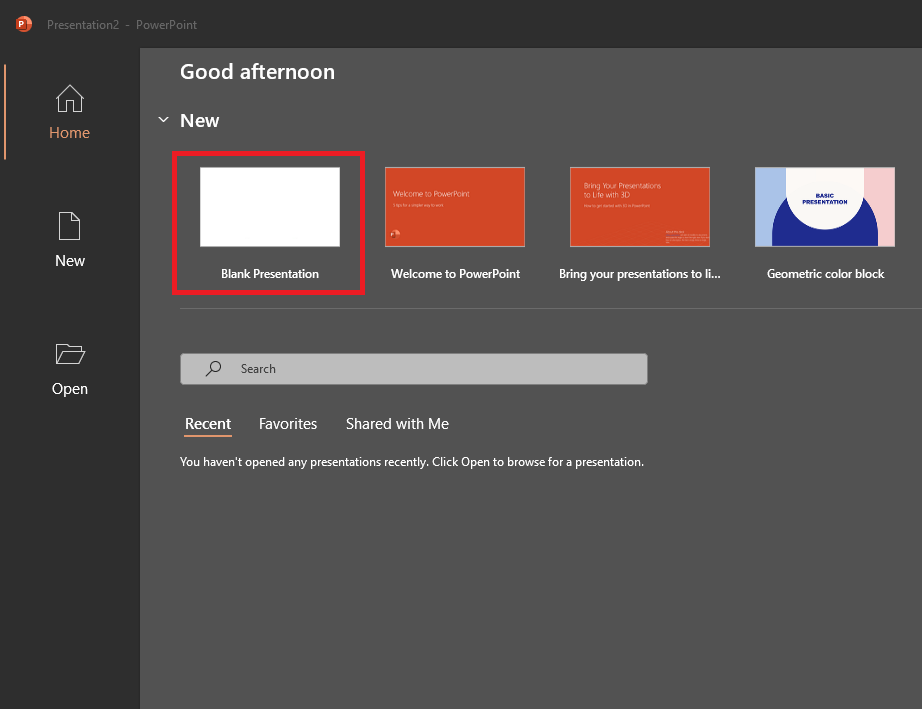
Step 1: Open PowerPoint app

Step 2: Access Screen Recording 

Open the “Insert” tab in the ribbon and click “Screen Recording” (located on the right side of the toolbar). Or, you can directly open it using the “Record” tab.
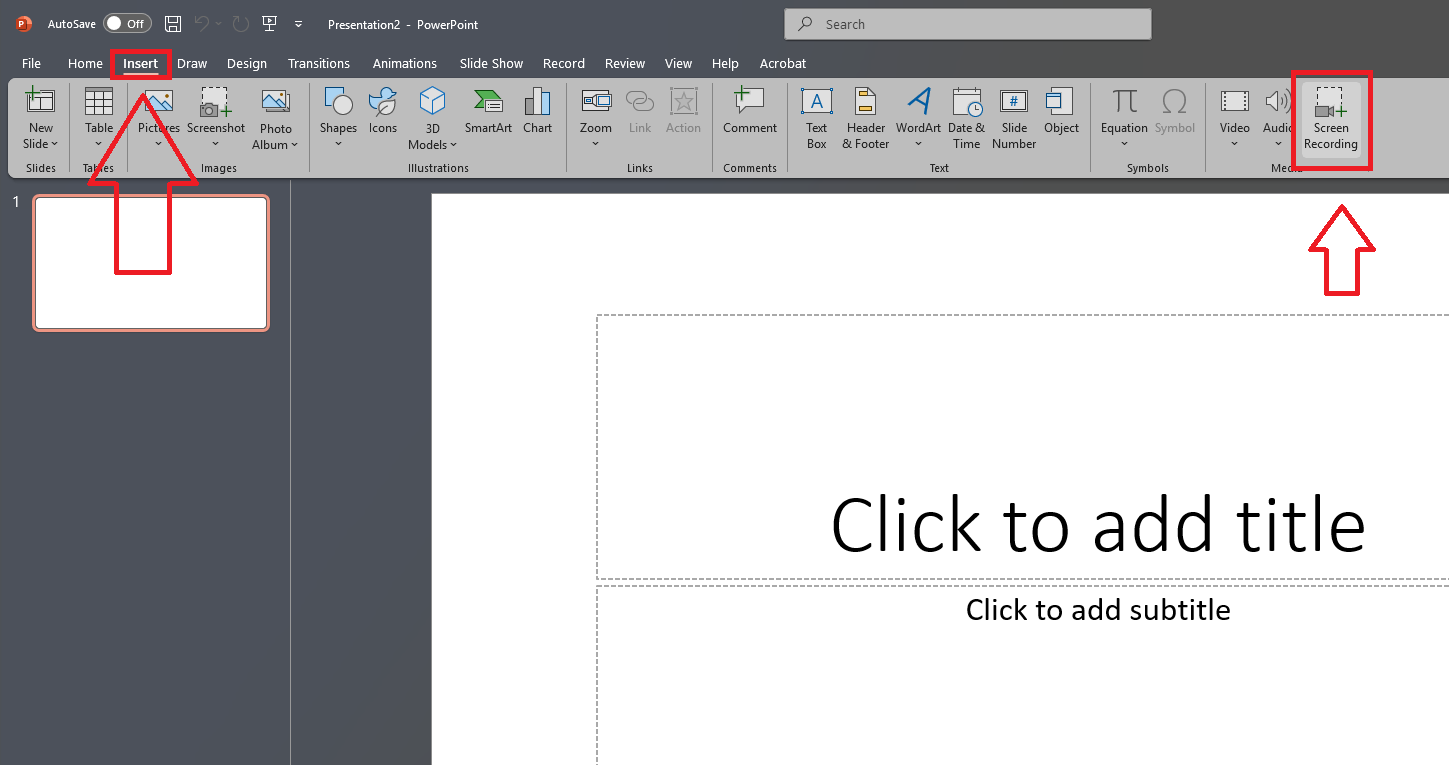
Step 2: Access Screen Recording

Step 3: Configure recording settings

A Control Dock appears at the top of your screen with the following options:

  • Select Area — Click to choose a specific screen area, or press Windows + Shift + F to record the entire screen
  • Audio — Enabled by default to capture system sounds and microphone input (click to disable if not needed or use Windows + Shift + U shortcut.)
  • Record Pointer — Enabled by default to show mouse movements (click to disable if not needed)

Step 3: Configure recording settings

Step 4: Select recording area

Click Select Area and use the cross-haired cursor to drag and select the portion of your screen you want to record. The minimum recording area is 64x64 pixels.
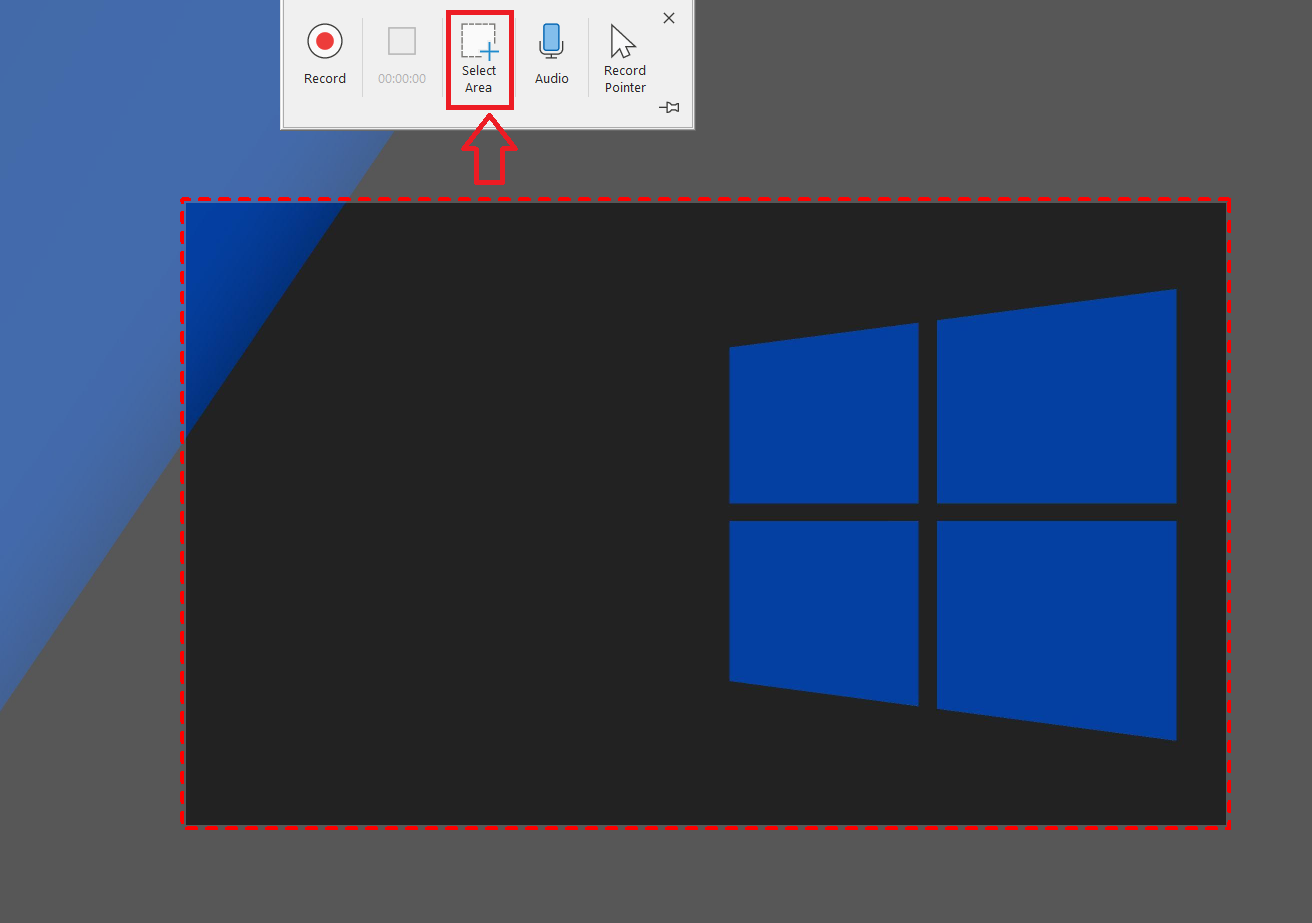
Step 4: Select recording area

Step 5: Start and stop recording

Click the red “Record” button to start; A 3-second countdown appears to signal recording.

Pro Tip: The Control Dock slides up into the screen margin during recording. To access it again, move your mouse cursor to the top of the screen.

While recording, you can:

  • Pause — Click “Pause” or press Windows + Shift + R
  • Resume — Click “Record” again or press Windows + Shift + R

When finished, click “Stop” or use the shortcut Windows + Shift + Q

Step 6: Review recording

Once you stop, the video auto-adds on your PowerPoint slide.

Step 6: Review recording

Step 7: Save recording as a separate file 

To use your recording outside of PowerPoint, right-click the video and select Save Media As. You then can select a custom location to save as an MP4 file.

Step 7: Save recording as a separate file

FAQs

What is the best free screen recorder for Windows 10?
How do I record my screen on Windows 10?
Can I record my screen on Windows 10 with audio?

Yes, you can record your screen with audio on Windows 10 using BetterBugs.io. Before you start recording, you can enable "Mic" and "Camera" capture. This allows you to add your voiceover or a video overlay to the recording, ideal for providing additional context and instructions.

Written by
Nishil Patel

Nishil Patel | CEO & Founder

Follow

Nishil is a successful serial entrepreneur. He has more than a decade of experience in the software industry. He advocates for a culture of excellence in every software product.

Subscribe to our updates

Meet the Author: Nishil Patel, CEO, and Co-founder of BetterBugs. With a passion for innovation and a mission to improve software quality.

We never spam.